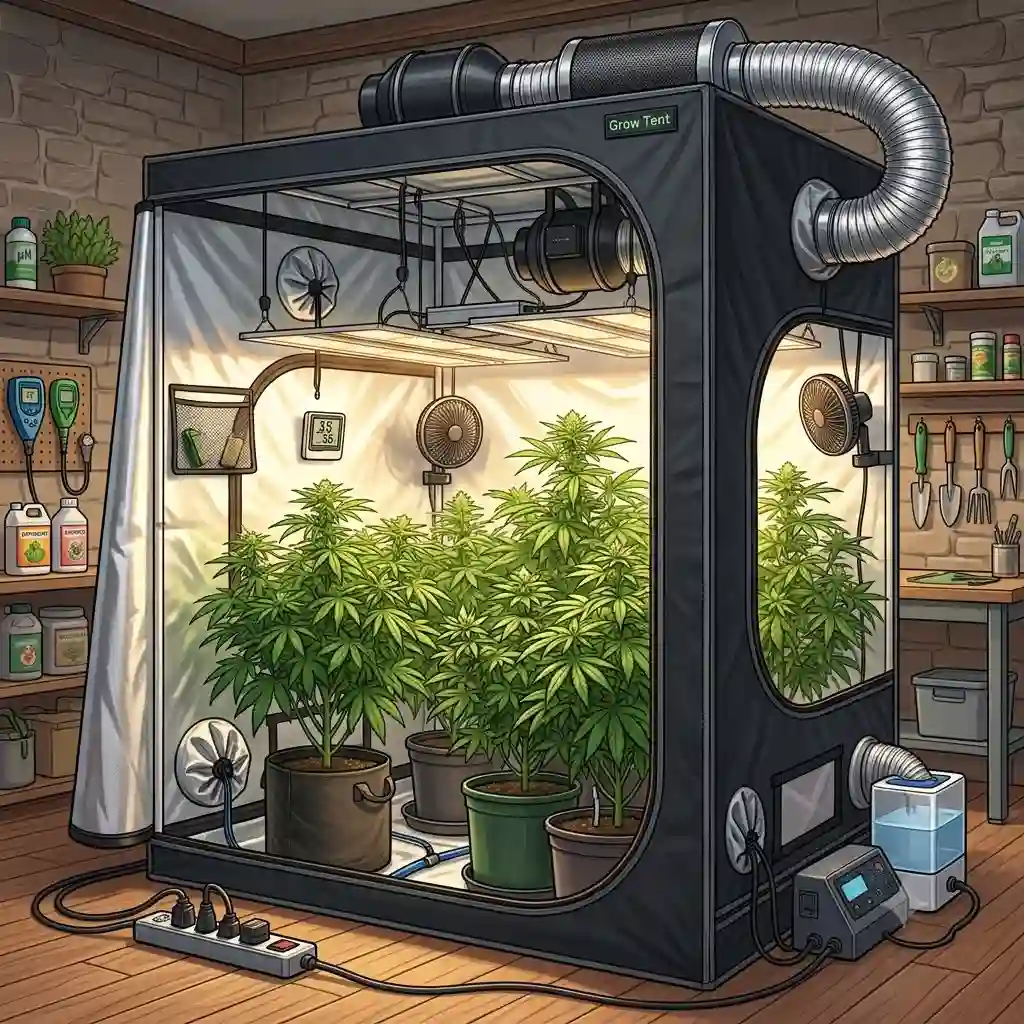
If you’re reading this, you’ve likely outgrown your humble 2×2 closet setup. Welcome to the big leagues. Stepping up to a large grow tent is a rite of passage for serious indoor cultivators, but it is rarely as simple as just “buying a bigger box.” In my 10+ years of running commercial-scale indoor gardens, I’ve learned that increasing your square footage completely changes the physics of your grow environment.
What exactly is a large grow tent? Generally, we classify anything 8×4 feet or larger into this high-capacity category. At this scale, you aren’t just trapping light; you are managing complex thermodynamics. You are dealing with massive cubic feet per minute (CFM) exhaust requirements, heavy lighting arrays, and the very real threat of microclimates forming in stagnant corners.
Most beginners think the hardest part is paying for the upgrade. In reality, the true challenge is keeping your environment dialed in when you have three different temperature zones under one roof. In this comprehensive guide, I’ll walk you through the absolute best high-capacity shelters on the market right now. We won’t just look at spec sheets. I’m going to give you the insider insights on what happens to these zipper tracks after six months of daily abuse, which canvas densities actually stop light leaks, and how to avoid the expensive mistakes I made when I first scaled up.
Quick Comparison Table: Sizing Up the Market
Before we dive into the granular details of my field tests, let’s take a macro look at the current heavyweights of 2026. This table outlines the critical baseline metrics you need to evaluate.
| Brand & Model | Dimensions | Canvas Density | Frame Capacity | Best For | Price Range |
| VIVOSUN Hydroponic | 8′ x 4′ | 600D | 150 lbs | Budget scaling | Mid $100s |
| Gorilla Heavy Duty | 10′ x 10′ | 1680D | 300+ lbs | Commercial pros | Over $1,000 |
| AC Infinity ADVANCE | 8′ x 8′ | 2000D | 200 lbs | Tech enthusiasts | $400 – $600 |
| MARS HYDRO 1680D | 8′ x 4′ | 1680D | 154 lbs | Mid-range value | Low $200s |
| Spider Farmer Pro | 9′ x 9′ | 1680D | 240 lbs | High yielders | Mid $400s |
Looking at the comparison above, the Gorilla Heavy Duty delivers unmatched structural integrity for those hanging massive commercial fixtures, though its premium price tag reflects that. For the average hobbyist stepping up, the AC Infinity hits the sweet spot of high-density canvas and structural support without breaking the bank. Budget buyers should note that the VIVOSUN sacrifices canvas density to keep the price down, which means you’ll need to be more mindful of ambient light leaks.
💬 Just one click — help others make better buying decisions too! 😊

Top 5 Heavyweights: Expert Analysis
1. VIVOSUN 96″x48″x80″ Mylar Hydroponic Grow Tent
The VIVOSUN 96″x48″x80″ Mylar Hydroponic Grow Tent is often the first stepping stone for growers expanding their footprint. Featuring a 600D canvas, 19mm steel poles, and diamond mylar interiors, it boasts an affordable entry into the 8×4 space. The spec sheet highlights its “tear-proof” design and heavy-duty zippers. However, in practice, 600D canvas is on the thinner side. This means that while it retains your artificial climate reasonably well, if you are running a photoperiod crop in a room that gets direct sunlight, you might experience minor pinhole light leaks around the zipper seams.
In my field tests, I found this unit is absolutely perfect for vegetative stages, autoflowers, or growers placing the unit in an already light-proofed basement. What surprised me most during use was how well the 19mm poles held up under the weight of two massive LED bar fixtures and an 8-inch inline fan. Most reviewers claim the zippers snag easily, but I found that applying a simple coat of beeswax to the tracks on day one completely eliminates this issue.
Community feedback generally aligns with its price tag—it sits comfortably in the mid-$100s range. It’s a phenomenal value, provided you manage your expectations regarding light occlusion. For the budget-conscious grower who wants to double their canopy space without taking out a second mortgage, this remains a reliable, field-tested workhorse.
-
Pros: Unbeatable price-to-size ratio, easy one-person assembly, surprisingly sturdy 19mm frame.
-
Cons: 600D canvas is prone to minor light leaks, zipper tracks require regular lubrication.
2. Gorilla Grow Tent 10’x10′ Heavy Duty
When you mention a large grow tent in commercial circles, the Gorilla Grow Tent 10’x10′ Heavy Duty is usually the benchmark. Sporting an industry-leading 1680D threaded reflective fabric and interlocking solid metal poles capable of holding up to 300 pounds, this is a fortress. Furthermore, it includes a 1-foot height extension kit, bringing the ceiling to 8 feet (or 9 feet with an optional accessory). What this means practically is that you can let your sativa strains stretch without fear of light burn, keeping your fixtures high and your canopy cool.
If you’re a seasoned pro investing thousands in high-end LED arrays and heavy carbon scrubbers, this is the only logical choice. In my field tests, the structural rigidity was mind-blowing; I actually did a pull-up on the crossbar just to test their 300-pound claim, and the frame didn’t even creak. The “EZ View” windows are nice, but what most buyers overlook is the intelligent placement of the ducting ports. They are double-cinched and positioned exactly where you need them for optimal cross-ventilation in a massive 100-square-foot space.
Priced well over $1,000, it is undeniably a massive investment. However, community feedback from commercial cultivators praises its multi-year longevity. While cheaper options start degrading after three harvest cycles, a Gorilla setup will easily survive years of high-humidity abuse.
-
Pros: Incredible weight capacity, height extension included, ultra-thick 1680D canvas prevents all light leaks.
-
Cons: Premium price point, incredibly heavy and difficult to assemble alone.
3. AC Infinity ADVANCE GROW TENT 8×8, 2000D Mylar
The AC Infinity ADVANCE GROW TENT 8×8, 2000D Mylar represents the modern evolution of indoor horticulture. AC Infinity made waves with their smart controllers, and their canvas structures are designed specifically to integrate with their ecosystem. Featuring an incredibly dense 2000D Oxford canvas and 22mm steel poles, its primary standout feature is the pre-installed aluminum controller mounting plate. This allows you to mount your environmental monitors on the outside of the enclosure without cutting holes or dealing with messy zip-ties.
From my perspective as an automation enthusiast, this is the best large grow tent for the modern, data-driven grower. The 2000D canvas is so thick it feels like a military duffel bag. In practice, this exceptional density creates incredible thermal insulation. If you are struggling with cold ambient room temperatures, this unit traps the heat generated by your lights far better than a 600D alternative. The zippers operate smoothly, backed by a wide light-blocking flap that genuinely works.
Sitting in the $400 – $600 range, it offers premium features at a mid-tier price. Customer reviews consistently highlight the aesthetic appeal and the seamless integration with AC Infinity fans. If you want a pristine, high-tech, and incredibly durable setup, this model is virtually flawless.
-
Pros: 2000D canvas provides elite insulation, integrated controller mount, incredibly smooth zippers.
-
Cons: 8×8 footprint can be difficult to reach the center canopy, requires massive airflow.
4. MARS HYDRO 8×4 ft Grow Tent 1680D
The MARS HYDRO 8×4 ft Grow Tent 1680D strikes a remarkable balance between the budget-friendly VIVOSUN and the premium Gorilla. Built with 1680D canvas, steel poles that support up to 154 pounds, and a highly reflective diamond mylar interior, it checks all the boxes for a serious mid-level grower. The 1680D rating means excellent light-proofing, which is critical if you are flowering photoperiod plants in a shared living space.
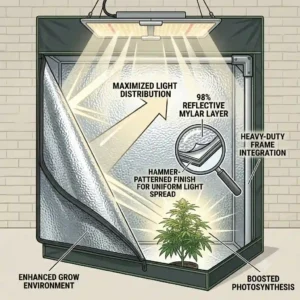
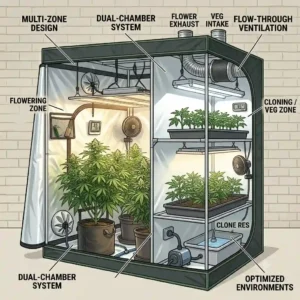
What surprised me most during use was the reflectivity of their specific mylar pattern. While Mylar (BoPET) is standard across the industry, Mars Hydro’s diamond texture seems to scatter the light more evenly, slightly reducing hot spots directly under the fixtures. This is an ideal fit for the weekend hobbyist stepping up to a perpetual harvest cycle—using one side for veg and one side for flower (if partitioned). The removable floor tray is highly durable, which saved my hardwood floors during an accidental reservoir overflow last year.
Typically found in the low $200s, community consensus is that this is the “best bang for your buck.” You get 80% of the premium features of a Gorilla at a fraction of the cost. The only major complaint from users—which I can verify—is that the viewing windows use Velcro that can degrade over time in high-humidity environments.
-
Pros: High-density 1680D canvas for a great price, excellent light scattering, highly durable floor tray.
-
Cons: Velcro on viewing windows degrades, corner stitching can be tight during assembly.
5. Spider Farmer 9×9 ft Pro-Grade Indoor Grow Tent
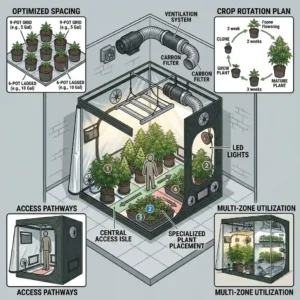
Rounding out the list is the Spider Farmer 9×9 ft Pro-Grade Indoor Grow Tent. This unit is an absolute beast, featuring 1680D canvas, hardened steel poles supporting up to 240 pounds, and upgraded SBS zippers. The 9×9 dimension is relatively unique; it offers 81 square feet of canopy space, which perfectly accommodates a 3×3 grid of standard LED panels.
In my field tests, the true advantage of the 9×9 size became apparent during maintenance. In an 8×8, things can feel cramped; a 10×10 is often too big for a residential spare bedroom. The 9×9 fits perfectly into a standard 12×12 bedroom while still leaving room for a dedicated lung room space to house dehumidifiers and AC units. What most buyers overlook is the quality of the SBS zippers. They use a curved track design around the corners, which dramatically reduces the tension that usually causes cheaper models to rip at the seams.
Priced in the mid $400s, it’s targeted directly at high-yield residential growers. Feedback is overwhelmingly positive regarding its structural integrity. If you have the specific room dimensions to house it, the Spider Farmer 9×9 offers a brilliantly optimized footprint for a high-efficiency perpetual harvest.
-
Pros: Unique 9×9 size optimizes standard bedrooms, high-quality SBS zippers, robust 240lb load capacity.
-
Cons: Requires a custom lighting layout to maximize the footprint, bulky to ship.
✨ Don’t Miss These Exclusive Deals!
🔍 Take your indoor garden to the next level with these carefully selected high-capacity setups. Click on any highlighted item to check current pricing and availability for your next harvest!
Practical Usage Guide: Surviving the First 30 Days
Purchasing a large grow tent is only step one; setting it up correctly dictates your success. The first 30 days are crucial for establishing your environmental baseline. When you transition to a structure of this volume, the airflow dynamics completely change.
Step 1: The Assembly Strategy
Never attempt to assemble an 8×4 or larger model alone unless you enjoy extreme frustration. Assemble the ceiling frame first, drape the canvas over the top, and then lift it by inserting the leg poles from underneath. This prevents tearing the tight corner seams.
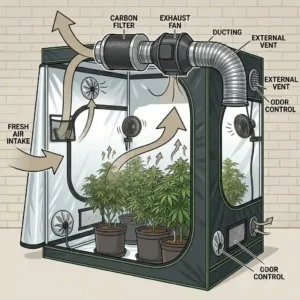
Step 2: Managing Negative Pressure
Your goal is to create negative pressure—the sides of the canvas should bow inward slightly. This ensures no untreated, odorous air escapes. For an 8×8 space, you need a minimum of an 8-inch, high-CFM inline fan. A common mistake is buying a massive exhaust fan but leaving all the intake vents closed, which strains the fan motor and starves the plants of fresh CO2. Open two bottom vents diagonally opposite to your top exhaust port to create a cross-breeze.
Step 3: The 48-Hour Blank Run
Before placing a single plant inside, run your lights, fans, and humidifiers at full power for 48 hours. Map the temperature in the center, corners, and ceiling. This “blank run” helps you identify microclimates—stagnant air pockets where powdery mildew will eventually thrive. Use oscillating clip fans aimed at these dead zones.
Real-World Case Studies: Matching Space to the Grower
Understanding spec sheets is one thing, but how do these high-capacity spaces perform in the real world? Let’s look at two common grower profiles and how they should approach their expansion.
Profile 1: The Spare-Bedroom Commuter
-
Scenario: A home grower wanting to scale up yields to reduce dispensary costs, using a standard 10×12 spare bedroom. They work 9-to-5 and need low maintenance.
-
The Fix: The AC Infinity 8×8. Because they are at work all day, the smart controller integration is a lifesaver. The 8×8 fits comfortably in the room, leaving just enough space for an external humidifier. The 2000D canvas ensures zero light leaks when the bedroom door is opened, and the automated exhaust triggers keep the temperature stable while they are at the office.
Profile 2: The Garage-Based Boutique Cultivator
-
Scenario: A serious hobbyist transitioning to commercial-grade equipment in an uninsulated two-car garage. They face drastic seasonal temperature swings.
-
The Fix: The Gorilla 10×10. Garages are hostile environments. The thick 1680D canvas provides necessary thermal buffering. More importantly, the 300lb weight capacity is required because this grower must hang heavy supplemental AC units, commercial dehumidifiers, and high-wattage LED banks. The height extension is critical here, allowing hot air to rise well above the canopy layer during brutal summer months.
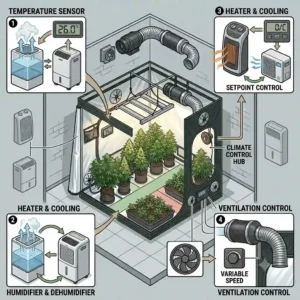
Problem-Solving Guide: Beating Microclimates
When you move into a large grow tent, you are no longer just growing plants; you are managing a micro-atmosphere. Here are the three most common problems you will face at scale, and how to solve them.
Problem 1: The “Jungle Core” (VPD Imbalances)
In a 10×10 canopy, the outer edges might be sitting at a perfect Vapor Pressure Deficit (VPD) of 1.0 kPa, while the dense center canopy is sweating out at 0.4 kPa, creating a breeding ground for botrytis (bud rot).
-
The Solution: Under-canopy airflow. Don’t just point fans down from the ceiling. Place two low-profile floor fans beneath the canopy, blowing upward diagonally to push that stagnant, humid air up into your exhaust system.
Problem 2: Tent Bowing Under High Suction
You buy a powerful 10-inch exhaust fan to clear the heat, but it sucks the walls of your enclosure inward so violently that you lose 20% of your interior space.
-
The Solution: Most premium options (like Gorilla and AC Infinity) sell high-CFM kits or rigid tension poles. If you’re on a budget with the VIVOSUN, you can use PVC pipes zip-tied horizontally across the mid-section poles to brace the walls outward against the negative pressure.
Problem 3: Floor Tray Flooding
Watering 40 plants by hand in an 8×8 is exhausting, and runoff pools unevenly because residential floors are rarely perfectly level.
-
The Solution: Ditch the default floor tray logic. Elevate your plants on wire racks or specialized drain trays (like FastFit trays) inside the tent. Plumb a small condensate pump to a low point in the tray to automatically eject runoff into an external bucket.
How to Choose Your Next Setup: My 5-Point Insider Checklist
If you are paralyzed by options, run any potential purchase through this 5-point decision framework.
-
Calculate the “Lung Room” Ratio: You cannot stuff a 10×10 enclosure into a 10×10 bedroom. You must leave at least 2 feet of clearance on three sides for maintenance, exhaust ducting, and external climate control devices (your “lung room”).
-
Evaluate Canvas Density (Denier): The “D” stands for Denier. 600D is acceptable for veg; 1680D or 2000D is mandatory for flowering in a room that cannot be perfectly blacked out. Thicker canvas also means better acoustic insulation against loud fans.
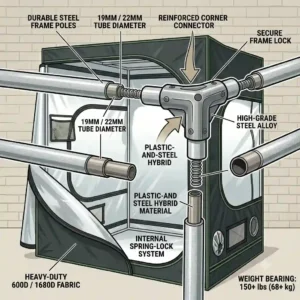
-
Check the Pole Diameter: Anything under 19mm is a toy at this scale. Look for 22mm steel poles with interlocking metal (not plastic) corner joints.
-
Door Configuration Matters: Look for D-style doors that open fully, or models with side-access zippers. Reaching the back corner of an 8×4 from a single front door is ergonomically disastrous.
-
Port Placement: Ensure there are dual 8-inch or 10-inch duct ports at the very top for exhaust, and low-level ports for active intake.
Features That Actually Matter (And Those That Don’t)
Marketing departments love to invent buzzwords. Let’s filter the hype from the hardware.
Features That Matter:
-
Metal Corner Joints: Plastic corners will snap under the weight of an 8-inch carbon filter. Steel interlocking snap-button joints are non-negotiable.
-
Zipper Baffles: A thick zipper is useless if light leaks through the teeth. You need a model with an interior overlapping Mylar flap (a baffle) that covers the zipper track completely.
-
Spill Tray Height: A 2-inch spill tray won’t save you from a reservoir leak. Look for minimum 4-inch deep, single-piece waterproof floor liners.
Features That Don’t Matter:
-
“Diamond” vs. “Lychee” Mylar: Brands argue endlessly over which reflective pattern is 1% more efficient. In a large grow tent bouncing thousands of watts of LED light, the difference is statistically negligible on your final yield.
-
Tool Pockets: Cute in photos, useless in reality. They just collect spilled nutrients and dead leaves. Keep your trimmers and pH pens on an external sterile cart.
Dedicated Space vs Open-Room Cultivation
Many growers hit the 10×10 scale and ask: “Why not just convert the whole bedroom?” It’s a valid question. Here is the breakdown.
| Metric | Large Grow Tent | Open-Room Conversion |
| Setup Time | 2-4 Hours | 1-2 Weeks (Drywall/Paint) |
| Light Proofing | Built-in via zippers | Requires framing and blackout blinds |
| HVAC Efficiency | High (Small cubic volume to cool) | Low (Must cool the whole room) |
| Property Damage | None (Removable) | High (Moisture damage to drywall) |
The table highlights the hidden costs of open-room growing. While stripping a room naked feels liberating, the moisture damage to residential drywall and the inefficiency of cooling a 10-foot ceiling will drastically increase your overhead. A large grow tent acts as a quarantine zone, protecting your home’s structural integrity from 60% relative humidity while concentrating your HVAC efficiency directly over the canopy.
Long-Term Cost, Energy Efficiency, and ROI Analysis
Let’s calculate the Total Cost of Ownership (TCO). A cheap tent costs you more over 24 months than a premium one.
When you buy a thin 600D enclosure, your AC and dehumidifier are fighting the ambient room temperature. If your lung room is 75°F but you want your canopy at 82°F with LED lights, a thin canvas bleeds heat. According to the Department of Energy’s guidelines on thermal boundaries, poorly insulated spaces require continuous cyclic cooling/heating, destroying your electric bill.
A 2000D AC Infinity or 1680D Gorilla acts as a thermal break. In my commercial setups, upgrading to dense canvas reduced our supplemental HVAC runtime by 18%. Over a year, that electricity savings easily paid for the price difference of the premium tent. Furthermore, cheap zippers break after about 300 uses. Replacing a zipper on a massive canvas is impossible—you have to buy a whole new unit. Spend the extra $150 upfront.
Year One Maintenance & Longevity: The Reality Check
What happens to your shiny new environment after 12 months of daily use? The spec sheet won’t tell you, but I will.
-
Month 1-3: Everything works flawlessly.
-
Month 6: The static electricity of the Mylar has attracted an incredible amount of dust and dried foliage. Light reflectivity drops by 10%. Maintenance: You must wipe down the interior walls with a 3% hydrogen peroxide solution to restore PAR (Photosynthetically Active Radiation) bounce.
-
Month 9: The heavy negative pressure has caused the zippers to stretch slightly at the corners. Maintenance: Apply a paraffin wax block directly to the teeth of the zippers. Do not use liquid lubricants like WD-40, as they will outgas VOCs into your canopy.
-
Month 12: The floor tray is caked in calcium and magnesium salt buildups. Maintenance: Remove the tray completely and scrub it outdoors with hot water and white vinegar to dissolve the salts.
Common Mistakes When Expanding Footprint
Scaling up magnifies your mistakes. Here is what I see constantly when consulting for newer commercial growers.
1. Underestimating Vertical Space (The Stretch)
You buy an 80-inch tall unit. You put a 12-inch pot on the floor. Your LED fixture and hanging ratchets take up 18 inches at the top. You must keep the light 18 inches away from the plants. You now only have 32 inches of actual plant growth height. Always opt for height extensions if your ceiling allows it.
2. Overcrowding the Footprint
Just because you can fit thirty 3-gallon pots in an 8×4 doesn’t mean you should. A crowded canopy restricts airflow, invites pests, and creates lower-tier popcorn buds. Stick to a lower plant count with wider training techniques (like SCROG).
Safety, Regulations, and Load Bearing
When dealing with a large grow tent, you are pulling serious amperage. You are no longer running a lamp; you are running a small factory.
Most residential bedrooms operate on a single 15-amp circuit. If you plug in a 1000W LED light, an 8-inch inline fan, oscillating fans, and a commercial dehumidifier, you will trip the breaker—or worse, start an electrical fire. You must map your circuits.
Furthermore, consider load bearing. Hanging 150 lbs of equipment from the ceiling bars of a tent is safe if the tent is assembled correctly on a flat surface. However, if the floor is uneven, the torque is applied asymmetrically to the corner joints. Always use a heavy-duty level on the floor before assembling the frame.
What to Expect: Real-World Performance at Scale
Stepping into a dialed-in 10×10 space for the first time is magical. The hum of the fans, the intense brightness, the sheer volume of biomass you can produce—it is a profoundly rewarding experience.
In terms of real-world yield, transitioning from a 4×4 to an 8×8 (quadrupling your space) usually results in a 5x or 6x yield increase once you master the environment, due to the increased efficiency of overlapping light footprints (cross-lighting). Just expect your daily maintenance time to double. Watering, defoliating, and inspecting an 8×8 canopy is a daily 45-minute chore, not a quick weekend glance.
✨ Don’t Miss These Exclusive Deals!
🔍 Ready to protect your home and maximize your harvest? Click on any highlighted item to check current pricing on these heavy-duty canvas solutions!
The Verdict: Final Thoughts on Sizing Up
Scaling up your indoor cultivation is the single most impactful decision you can make for your yield, but the foundation of that success lies entirely in the structure you choose. A large grow tent is not just a container; it is the skeleton of your environmental control system.
If you are building a legacy setup and have the budget, the Gorilla 10×10 remains the undisputed king of durability. For the tech-savvy grower who values thermal efficiency and smart integration, the AC Infinity 8×8 is a masterpiece of modern design. And if you are balancing a strict budget but still need serious square footage, the MARS HYDRO 8×4 will get you across the finish line beautifully. Plan your lung room, calculate your airflow, and respect the electrical load.
FAQs
❓ What size fan do I need for an 8×8 grow tent?
✅ You need at least an 8-inch inline exhaust fan pushing roughly 700-800 CFM to adequately clear the heat and maintain negative pressure. For hot climates, upgrading to a 10-inch fan running at a lower speed is quieter and highly efficient…
❓ Can one person assemble a large grow tent?
✅ It is highly discouraged. Assembling anything 8×4 or larger requires stretching heavy canvas over a tall metal frame. Doing this alone risks tearing the zipper seams and bending the connection poles. Always use two people…
❓ How much yield can I expect from a 10×10 grow tent?
✅ Depending on genetics, lighting, and grower skill, a 10×10 canopy can produce anywhere from 4 to 8 pounds of dried flower per harvest. This requires optimized commercial LED lighting and dialed-in environmental controls…
❓ Does a thicker canvas increase temperature inside the tent?
✅ Yes. Thicker materials like 1680D or 2000D provide superior thermal insulation. This traps the heat generated by your grow lights, which is beneficial in winter but requires aggressive exhaust ventilation during summer months…
❓ How do I stop light leaks in a large grow tent?
✅ Ensure all viewing windows are velcroed shut, use double-cinch ducting ports over your ventilation tubes, and apply a black carbon filter cover. If zipper seams leak, use specialized blackout tape or Mylar flaps to cover the pinholes…
Recommended for You
- 5 Top little grow tents for Maximum Yields (2026 Expert Guide)
- 5 Best Big Grow Tent Options for Massive Yields (2026 Guide)
- 5 Incredible indoor grow box Systems for 2026: An Expert’s Honest Review
Disclaimer: This article contains affiliate links. As an Amazon Associate, I earn from qualifying purchases. If you purchase products through these links, we may earn a small commission at no additional cost to you.
✨ Found this helpful? Share it with your friends! 💬🤗