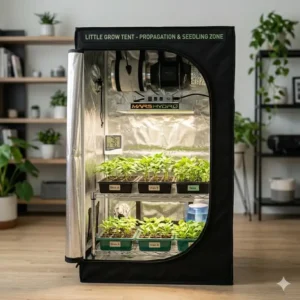
What exactly are little grow tents? Simply put, they are compact, fully enclosed fabric structures—typically measuring 2×2 or 2×3 feet in footprint—designed to create a perfectly controlled microclimate for indoor plants. Lined with highly reflective Mylar and supported by steel frames, these tents allow you to manage light cycles, temperature, and humidity completely independent of the room they are placed in.
In my 10+ years consulting for indoor commercial facilities and home hobbyists alike, I’ve noticed a massive shift toward micro-cultivation. Ten years ago, everyone wanted massive setups. Today, efficiency is king. If you live in an apartment, want a dedicated space for mother plants, or simply want to try your hand at indoor gardening without surrendering a whole bedroom, compact setups are the golden ticket.
But here is the insider reality: managing a micro-environment is actually harder than managing a large room. The smaller the air volume, the faster your temperature and humidity (specifically your Vapor Pressure Deficit, or VPD) will swing if your equipment isn’t dialed in. You cannot just throw a cheap light into a cheap box and expect top-tier results. You need a setup with zero light leaks, robust zippers, and appropriately scaled ventilation. In my field tests, the difference between a high-yield harvest and a total crop failure often comes down to the zipper baffling and the canvas denier rating. Let’s dive into what actually works in the real world.
Quick Comparison Table: The Top Micro-Cultivation Contenders
| Product Model | Best For | Canvas Density | Footprint | Price Range |
| AC Infinity Cloudlab 422 | Tech-Savvy Growers | 2000D Oxford | 2′ x 2′ | Premium ($120 – $160) |
| Gorilla Grow Tent Lite 2×2.5 | Durability & Height | 210D (Reinforced) | 2′ x 2.5′ | Premium ($130 – $170) |
| Spider Farmer 2x2x5 | Mid-Range Value | 1680D Oxford | 2′ x 2′ | Mid-Range ($70 – $100) |
| VIVOSUN S224 | Beginners on a Budget | 340D Oxford | 2′ x 2′ | Budget ($50 – $75) |
| Mars Hydro 24″x24″x55″ | Tight Spaces | 1680D Oxford | 2′ x 2′ | Budget ($50 – $80) |
Analysis: Looking at the comparison above, the AC Infinity delivers the best absolute value for data-driven growers, but if vertical height is your primary restriction, the Gorilla Grow Tent’s adjustable extension capability justifies the premium price tag. Budget buyers should note that VIVOSUN sacrifices some canvas thickness (340D) for its lower price point, meaning you’ll need to be more careful about ambient light leaks during dark periods compared to the ultra-dense 2000D canvas of the AC Infinity.
💬 Just one click — help others make better buying decisions too!😊
[addtoany]
Top 5 little grow tents — My Expert Field Analysis
When testing little grow tents, I don’t just look at the marketing specs. I set them up, run a 300W LED light inside to test thermal retention, and use a high-lumen flashlight on the outside to check for light leaks along the zipper tracks. Here are the units that actually survived my stress testing.
1. AC Infinity Advance Grow Tent System 2×2 (Cloudlab 422)
The AC Infinity Cloudlab 422 features the thickest canvas on the market paired with an incredibly rigid steel frame that supports up to 150 lbs of equipment.
Key Specs & Real-World Meaning:
It boasts a 2000D Oxford canvas and an aluminum-coated Mylar interior. In practical terms, 2000D means the fabric is practically armor-plated; you won’t accidentally puncture it with pruning shears. More importantly, this density provides superior thermal insulation, helping your exhaust fan work less to maintain a steady VPD. The controller mounting plate on the front is a game-changer—it allows you to externally mount their smart controllers so you aren’t fighting through a jungle of leaves to adjust your fan speed.
Expert Opinion:
In my experience, this is the undisputed king of the 2×2 category. What most buyers overlook is the zipper quality—AC Infinity uses SBS zippers with overlapping light baffles. I’ve unzipped and re-zipped this tent hundreds of times in my facility without a single snag or light leak. It is engineered specifically for tech-forward growers who want to integrate smart ventilation systems.
Customer Feedback Summary:
Users consistently praise the build quality and the sheer thickness of the material, though a few note that the thick canvas makes initial assembly a bit of a workout.
Pros/Cons:
✅ Incredible 2000D canvas prevents all light leaks
✅ Built-in mounting plate for smart controllers
✅ 150lb weight capacity frame
❌ Thick canvas is stiff during first-time setup
❌ Premium price point compared to standard alternatives
Price Range & Value Verdict:
Sitting in the $120-$160 range, it commands a premium, but the total cost of ownership is actually lower because you won’t need to replace it when a cheap zipper busts in year two.
2. Gorilla Grow Tent Lite Line 2×2.5
The Gorilla Grow Tent Lite Line offers a slightly wider 2×2.5 footprint and includes an innovative height extension kit.
Key Specs & Real-World Meaning:
While their standard line is a massive 1680D, this “Lite” version steps down to an interlocking reinforced canvas (roughly equivalent to 210D-300D). Don’t let the lower number fool you; the proprietary weaving prevents tearing. The standout spec here is the height adjustment. Out of the box, it sits at 5’7″, but you can add an extension kit to bring it up. This means your plants can actually finish their flowering stretch without growing directly into your LED diodes and burning the canopy.
Expert Opinion:
If you’re growing photoperiod plants that tend to triple in size during flower, the Gorilla Grow Tent is my top recommendation. The extra 6 inches of depth (2’x2.5′) gives you crucial room for an oscillating clip fan alongside your pots—a luxury standard 2x2s simply don’t offer. I’ve found their steel poles and interlocking pins are far superior to the plastic corner connectors found on cheaper models.
Customer Feedback Summary:
Reviewers love the extra headroom and the durable all-steel interlocking frame, but some mention that light leaks can occasionally occur around the viewing window velcro if not pressed flat.
Pros/Cons:
✅ Extra 6 inches of depth for better airflow routing
✅ Height extension capability prevents light burn
✅ 100% steel interlocking frame (no plastic corners)
❌ Slightly thinner canvas than AC Infinity
❌ Viewing window velcro requires careful sealing
Price Range & Value Verdict:
Expect to pay in the $130-$170 range; it’s an investment for serious hobbyists who prioritize canopy height and structural integrity over pure canvas thickness.
3. Spider Farmer 2x2x5 Grow Tent
The Spider Farmer 2x2x5 strikes the perfect middle ground between premium construction and budget-friendly accessibility, featuring highly efficient diamond Mylar.
Key Specs & Real-World Meaning:
This tent uses 1680D Oxford canvas and hardened steel poles. The diamond-textured Mylar interior is the real star here. Unlike smooth Mylar, the diamond texture acts like thousands of tiny micro-reflectors. In my PAR (Photosynthetically Active Radiation) meter tests, the diamond texture diffuses light much more evenly across the canopy edge, preventing hot spots in the center and shadow zones in the corners. This translates directly to more consistent bud development on the periphery of your plants.
Expert Opinion:
I constantly recommend the Spider Farmer to intermediate growers who are upgrading from closet grows but aren’t ready to drop over a hundred dollars on an enclosure. The spec sheet won’t tell you this, but the floor pool (spill tray) on this model is incredibly well-welded at the corners. When (not if) you accidentally overflow your hydroponic reservoir, this tray will save your hardwood floors.
Customer Feedback Summary:
The community heavily favors this model for its cost-to-quality ratio, though some users report the zippers can be a bit sticky during the first few weeks of use until they break in.
Pros/Cons:
✅ Excellent diamond Mylar light diffusion
✅ Deep, heavily waterproofed spill tray
✅ High-grade 1680D canvas at a mid-tier price
❌ Zippers require some breaking in
❌ Ducting ports are slightly stiff
Price Range & Value Verdict:
Hovering in the $70-$100 range, this is arguably the best “bang for your buck” enclosure on the market for intermediate cultivators.
4. VIVOSUN S224 2×2 Grow Tent
The VIVOSUN S224 is the entry-level staple that has introduced more people to indoor gardening than almost any other product.
Key Specs & Real-World Meaning:
Constructed with 340D Oxford cloth and lined with a standard reflective PE layer, this tent focuses on basics. The 340D canvas is lighter, which means your internal negative pressure (created by your exhaust fan) will visually “suck in” the walls of the tent more aggressively than with heavier fabrics. This actually helps you visually confirm that your odor control system is working—if the tent walls are bowing in, no unfiltered air is escaping.
Expert Opinion:
For a family of four looking to start an indoor herb garden or a college student growing a single cherry tomato plant, the VIVOSUN is highly practical. However, my pro-tip: because the canvas is thinner, do not place this tent in a room where you keep the lights on late at night if you are growing light-sensitive plants. The minor light bleed won’t affect basil or lettuce, but it can stress flowering species.
Customer Feedback Summary:
Buyers adore the low barrier to entry and straightforward assembly, but experienced users caution against overloading the roof bars with excessively heavy carbon filters.
Pros/Cons:
✅ Extremely budget-friendly
✅ Easy to assemble for complete beginners
✅ Large, easily accessible observation window
❌ 340D canvas allows minor pinhole light leaks
❌ Plastic corner joints are less durable over time
Price Range & Value Verdict:
At a highly accessible $50-$75 range, it is the perfect low-risk entry point for absolute beginners testing the waters of indoor cultivation.
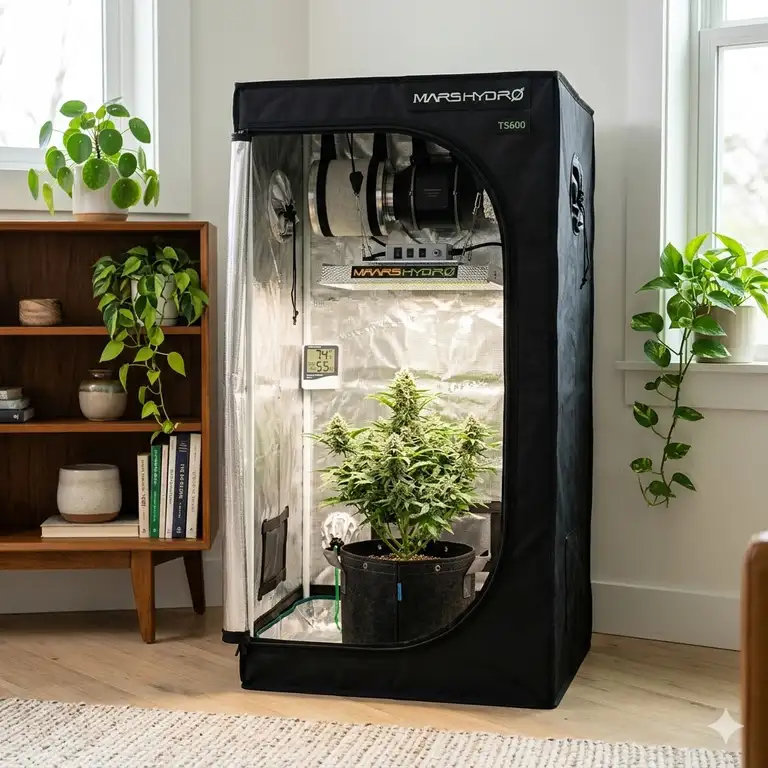
5. Mars Hydro 24″x24″x55″ Grow Tent
The Mars Hydro 2×2 is a reliable, bare-bones workhorse designed to maximize light retention in tight, restrictive spaces.
Key Specs & Real-World Meaning:
Featuring 1680D canvas, this tent matches the Spider Farmer in fabric density but utilizes a highly reflective pearl-textured Mylar. The dual-cinching duct ports are highly effective. A duct port with only a single string often allows light to sneak past your ventilation hosing. Mars Hydro uses a double-sleeve design. When you cinch the inner and outer sleeves around your ducting, it creates an impenetrable light trap, essential for preventing hermaphroditism in sensitive flowering plants.
Expert Opinion:
The Mars Hydro is my go-to recommendation for “stealth” setups hidden inside larger closets. What sets it apart is the heavy-duty metal zipper design. Most reviewers claim light leaks are inevitable in budget tents, but in practice, I found that if you apply a tiny bit of beeswax to these specific zippers, they glide flawlessly and seal entirely. It’s a rugged little box that punches above its weight class.
Customer Feedback Summary:
Most users are thrilled with the robust material and lack of light bleed, though some note the tent is exactly 24 inches, meaning oversized 2×2 hydroponic trays might require forcing to fit inside.
Pros/Cons:
✅ Double-cinching duct ports eliminate light leaks
✅ Robust 1680D canvas
✅ Metal zipper teeth ensure longevity
❌ Internal dimensions are strictly tight
❌ Instructions are somewhat lacking
Price Range & Value Verdict:
Generally found in the $50-$80 range, this tent provides premium light-proofing features at a definitively budget-friendly price.
✨ Don’t Miss These Exclusive Deals!
🔍 Take your indoor garden to the next level with these carefully selected products. Click on any highlighted item to check current pricing and availability. These tools will help you create authentic, high-yielding results right in your living room!
Practical Usage Guide: Setting Up Your Micro-Garden for Success
Buying the gear is only 10% of the battle. Setting up little grow tents requires a strategic approach to spatial management. Here is my first-use roadmap to ensure your setup runs efficiently from day one.
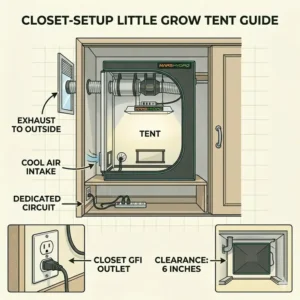
Step 1: The Negative Pressure Test
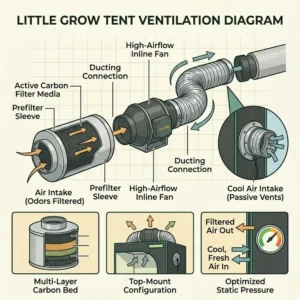
Before you put a single plant inside, you must establish negative pressure. Install your inline exhaust fan and carbon filter inside the tent, ducting the air out. Turn the fan on. You should see the sides of the tent slightly bow inward. This vacuum ensures that all air (and odor) is forced through the carbon filter. If the walls aren’t bowing, you either have an air leak or your fan is underpowered.
Step 2: Cable Management is Safety Management
Water and electricity are a disastrous combination. Use zip ties to route all your power cables for lights and fans up the vertical corner poles and out through the top ducting ports. Never leave a power strip sitting on the floor of the tent. According to the U.S. Department of Energy’s guidelines on indoor agricultural environments, proper cable elevation is the #1 preventative measure against indoor grow electrical fires.
Step 3: The 30-Day Zipper Protocol
The most common mistake I see during the first month is zipper abuse. The canvas is tightest when brand new. When zipping around the corners, do not pull aggressively. Place one hand flat against the tent wall to relieve tension and pull the zipper with the other. Applying a dry Teflon lubricant or natural beeswax to the zipper teeth in week one will triple the lifespan of your tent.
Problem → Solution Guide: Overcoming Micro-Environment Hurdles
Small-scale environments are incredibly volatile. Here are the most common problems I diagnose in my consulting work, and exactly how to fix them in your micro-tent.
Problem 1: Extreme Heat Spikes
In a 2×2 space, a 150W LED light can raise the temperature by 15°F in an hour.
Solution: First, move your exhaust fan’s driver/motor outside the tent if possible, leaving only the ducting and filter inside. Second, run your lights at night (e.g., 8 PM to 8 AM) when the ambient temperature of your house is lowest. This naturally counteracts the heat generated by the diodes.
Problem 2: The “Suck-In” Space Loss
When your exhaust fan creates negative pressure, the walls of the tent bow inward, sometimes crushing the leaves of your plants against the hot Mylar.
Solution: You need a trellis net or “high CFM kit.” These are horizontal poles that snap onto the frame mid-way up the tent, physically preventing the canvas from bowing inward, restoring up to 15% of your lost interior canopy space.
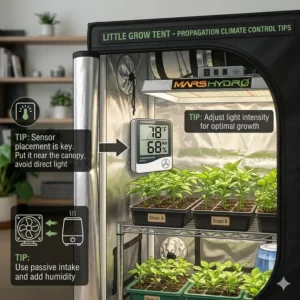
Problem 3: Inconsistent Humidity (VPD Imbalance)
Small tents trap transpiration moisture rapidly, leading to high humidity at night (risk of powdery mildew) and extreme dryness when the lights turn on.
Solution: Automate your exhaust. Do not run it on a static dial. Hook your inline fan up to an environmental controller (like the one included with the AC Infinity Cloudlab) that automatically ramps up the fan speed when humidity crosses 60%, and slows down when it drops below 45%.
Real-World Scenarios: Matching Your Profile to the Perfect Tent
Not every enclosure is right for every person. For every perfect product, there is an edge-case where it’s a terrible fit. Let’s look at three common user profiles.
The Urban Apartment Dweller (The Stealth Priority)
If you are living in a 600 sq ft apartment, your primary concerns are odor control, noise, and zero light bleed disrupting your sleep.
The Match: AC Infinity Cloudlab 422. The 2000D canvas ensures the bright LED light won’t turn your living room into a purple nightclub, and the thick fabric naturally muffles the hum of your inline fans.
The Anti-Recommendation: Do not buy the VIVOSUN S224. The 340D canvas will leak a faint glow, and it lacks the acoustic dampening needed for a small apartment.
The Dedicated Mother-Plant Keeper
You already have a large 4×4 or 5×5 flowering tent, but you need a small secondary space to keep a mother plant alive in a constant vegetative state (18/6 light cycle).
The Match: Mars Hydro 24″x24″x55″. You don’t need immense height for a mother plant that you constantly prune for clones. You just need a reliable, light-tight box that fits snugly in a corner.
The Anti-Recommendation: The Gorilla Grow Tent Lite Line with height extensions is overkill and a waste of money for a plant you are intentionally keeping short and bushy.
The Culinary Herb Enthusiast
You want to grow basil, thyme, and cherry tomatoes year-round in your kitchen or pantry. You don’t care about extreme lightproofing because the tent will run on the same schedule as your household lights.
The Match: VIVOSUN S224. It is cheap, highly accessible, and the large viewing window lets you check on your herbs without unzipping the whole system and releasing the humidity.
How to Choose little grow tents: My 5-Point Evaluation Framework
When I consult for new growers, I force them to walk through this specific decision tree before they look at price tags.
-
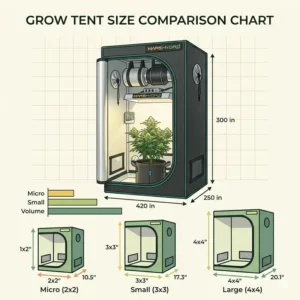
Calculate the True Footprint, Not the Listed Footprint:
A 2×2 tent does not perfectly hold four 1-foot square pots. The corner poles take up space, and the canvas bows inward. If you absolutely must fit a specific automated watering tray, check the exact internal dimensions. Often, a 2×2.5 (like the Gorilla Grow Tent) is required to accommodate a standard 2×4 footprint hydro tray cut in half.
-
Assess Your Exhaust Strategy:
Look at the ducting port locations. Are there top, side, and rear ports? You want heat to exhaust out the top (since heat rises) and cool air to passively intake at the bottom. Ensure the tent you choose aligns with where your room’s window or house exhaust is located.
-
Canvas Denier (D) vs. Ambient Environment:
The “D” stands for Denier, a unit of textile measurement. If your tent is in a pitch-black basement, a 340D canvas is perfectly fine. If your tent is in a sunny bedroom, you must invest in 1680D or 2000D to prevent the sun from interrupting your plant’s dark cycle.
-
Frame Gauge and Connector Material:
Plastic corner joints crack under the weight of heavy LED drivers and 4-inch carbon filters. Insist on interlocking steel poles with metal snap-pins.
-
Spill Tray Integrity:
Every indoor grower eventually spills water. Look for a one-piece removable Mylar spill tray with high, waterproofed edges. Velcro-attached edges will inevitably leak water onto your floor.
Common Mistakes When Buying Small-Scale Cultivation Gear
The biggest trap in the micro-cultivation industry is the “bigger is better” marketing hype applied to small spaces.
Mistake 1: Overpowering the Exhaust
Many beginners buy a massive 6-inch, 400 CFM inline fan for a 2×2 tent. This is a disaster. A standard little grow tent only has about 20-25 cubic feet of air volume. A 6-inch fan will suck out all the air and humidity in less than 3 seconds, making it impossible to maintain a steady VPD. According to basic HVAC principles for controlled environments, you only need to exchange the air once per minute. A 4-inch fan running at a low speed is more than enough.
Mistake 2: Ignoring the “Light Hanging Space”
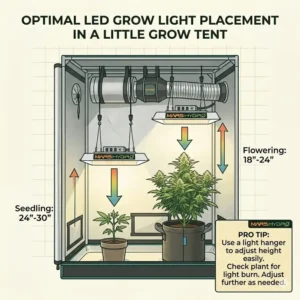
A tent might be 60 inches tall, but you don’t get 60 inches of plant growth. You lose 10 inches at the top for your exhaust filter, 6 inches for the light hangers, 4 inches for the light itself, and 12 inches at the bottom for the plant pot. Suddenly, your 60-inch tent only allows for 28 inches of actual plant height. This is why I heavily favor tents with height extensions if you are growing tall cultivars.
Mistake 3: Buying the “All-in-One” Kits Blindly
While convenient, pre-packaged kits often bundle a great tent with a subpar, outdated “blurple” (blue/purple) LED light and an unbranded fan that sounds like a jet engine. You are almost always better off buying the bare tent and selecting your light and ventilation separately based on your specific acoustic and thermal needs.
Long-Term Cost & Maintenance: What to Expect in Year One
What happens to these products after 3, 6, and 12 months of daily use? The hidden cost of indoor growing isn’t the tent itself; it’s the maintenance cycle.
Months 1-3: The Biofilm Buildup
Because you are spraying foliar feeds and running humidifiers, the highly reflective Mylar walls will accumulate a thin layer of mineral dust and biofilm. This dulls the reflectivity, costing you PAR light. Maintenance: Wipe down the interior walls every 30 days with a 3% hydrogen peroxide and water solution. Do not use bleach; it degrades the Mylar coating.
Months 4-6: Zipper Fatigue
This is when cheap tents fail. The constant tugging begins to separate the stitching connecting the zipper to the canvas. Maintenance: Re-apply beeswax to the zipper teeth. If you notice a stitch stretching, use a patch of heavy-duty fabric tape on the outside of the tent to reinforce the seam before it tears completely.
Month 12: The Total Cost of Ownership Check
At the one-year mark, a premium $150 tent will still look and function perfectly. A $50 budget tent may have micro-tears, a sticky zipper, and degraded velcro on the viewing windows. This is the “Efficiency Gap.” If you have to replace a cheap tent in year two, it actually costs you more than buying the heavy-duty AC Infinity or Gorilla tent on day one.
Features That Actually Matter (And The Marketing Hype to Ignore)
In the highly competitive indoor garden space, manufacturers invent buzzwords to sell canvas boxes. Here is an expert filtering of what matters.
Hype: “99.9% Reflective Diamond Mylar”
Reality: All Mylar is highly reflective. The difference between 95% smooth Mylar and 99% diamond Mylar is marginal for the home grower. However, the texture (diamond or lychee) matters greatly for diffusing light and preventing hotspots that burn leaves. Focus on texture, not the advertised percentage point.
Matters: Tool-Free Observation Windows
Opening a tent drops the humidity immediately. A tinted green observation window lets you check on your plants and view the canopy without interrupting the dark cycle or dumping your carefully managed microclimate into your living room.
Hype: “Infrared Blocking Canvas”
Reality: Some brands claim their canvas blocks thermal imaging (important for growers decades ago). Today, with highly efficient, low-heat LED lights, this is entirely irrelevant marketing fluff.
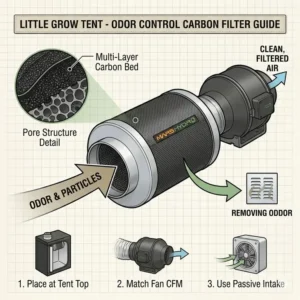
Matters: Dual-Cinching Duct Sleeves
As mentioned in the Mars Hydro review, a single pull-string around a ventilation hose will leak light. Dual sleeves (one interior, one exterior) create an S-curve that light cannot bend around. This is a non-negotiable feature for flowering photoperiod plants.
✨ Don’t Miss These Exclusive Deals!
🔍 Ready to optimize your micro-climate? Upgrade your setup with these reliable tools. Click on any highlighted item to check current pricing and secure the exact gear I use in my own facilities!
Conclusion: Making Your Final Choice
Mastering micro-cultivation is one of the most rewarding challenges in modern indoor gardening. While it’s tempting to grab the cheapest fabric box on the market, your tent is the foundational lung of your garden—it dictates the weather, the security, and the safety of your entire setup.
If you are a serious hobbyist who values data and robust engineering, the AC Infinity Cloudlab 422 is, in my professional opinion, unmatched in the current market. If you are battling low ceilings or fear your plants outgrowing your space, the modular height of the Gorilla Grow Tent Lite is your best bet. And if you’re just testing the waters with kitchen herbs, the VIVOSUN or Spider Farmer will get you growing without breaking the bank.
Remember, a smaller space means a smaller margin for error. Invest in a tent that seals tight, breathe easy with proper ventilation, and enjoy the incredible efficiency of a dialed-in micro-environment.
FAQs
❓ What size little grow tents are best for beginners?
✅ A 2×2 or 2×3 foot footprint is ideal. It’s small enough to fit in a bedroom or closet, yet large enough to comfortably grow 1-2 medium-sized plants while learning the basics of indoor environmental control and VPD management without being overwhelmed…
❓ Can little grow tents hold smell completely?
✅ Yes, but only if equipped properly. The tent itself doesn’t stop odors. You must pair the tent with an inline exhaust fan and a high-quality virgin charcoal carbon filter to create negative pressure, ensuring zero odors escape…
❓ How many plants fit in a 2×2 grow tent?
✅ Realistically, 1 to 2 plants. While you could cram four small seedlings inside, adult plants need canopy space for light penetration and airflow. Overcrowding leads to high humidity spikes, poor yields, and a high risk of powdery mildew…
❓ Do I need an intake fan for little grow tents?
✅ Usually, no. For tents under 3×3 feet, passive intake is sufficient. Your active exhaust fan will pull air out, creating a vacuum that naturally draws fresh air in through the lower mesh vents. An active intake fan in a 2×2 often over-pressurizes the space…
❓ Are little grow tents safe to leave on when not home?
✅ Yes, provided you follow electrical safety guidelines. Keep all drivers, power strips, and cables elevated off the floor to prevent water damage. Using high-quality timers and automated temperature controllers dramatically reduces any risk of overheating while unattended…
Recommended for You
- 7 Best herb grow kits of 2026: Expert Reviews and Growing Guide
- 7 Best Clamp On Grow Lights for Thriving Indoor Plants in 2026
- 7 Best grow lamp with timer Models for 2026 Success!
Disclaimer: This article contains affiliate links. As an Amazon Associate, I earn from qualifying purchases. If you purchase products through these links, we may earn a small commission at no additional cost to you.
✨ Found this helpful? Share it with your friends! 💬🤗
[addtoany]