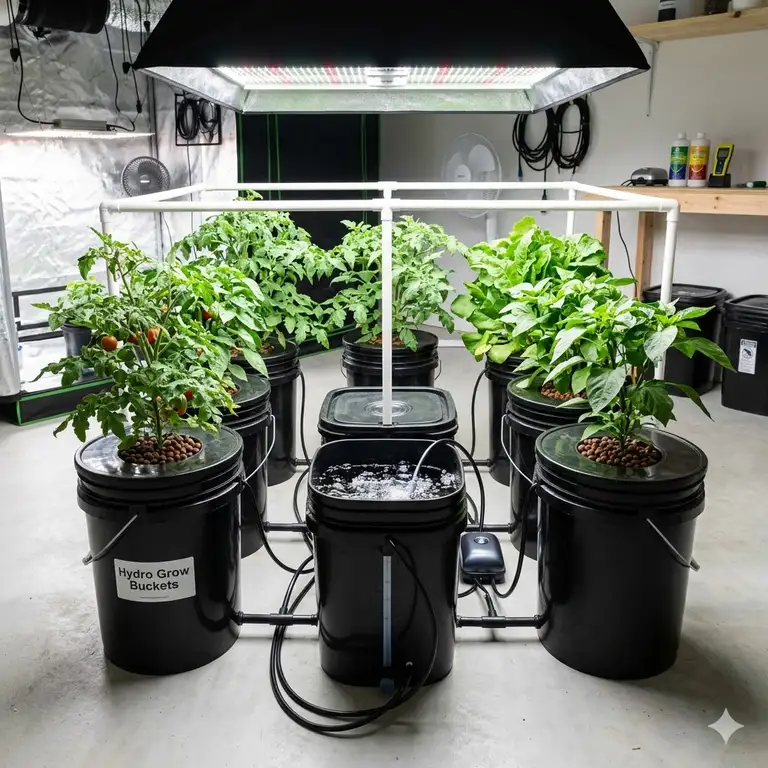
If you had asked me ten years ago what the future of home gardening looked like, I would have pointed to a messy pile of PVC pipes and leaky reservoirs. Fast forward to 2026, and the landscape has shifted dramatically. Today, hydroponic grow buckets have become the gold standard for both hobbyists and commercial boutique growers who want “set-it-and-forget-it” reliability without sacrificing yield quality. Having spent over a decade in the hydroponics consulting space, I’ve seen these systems evolve from DIY “bucket-and-a-prayer” setups to high-tech, integrated kits that practically manage themselves.
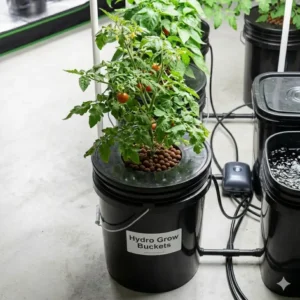
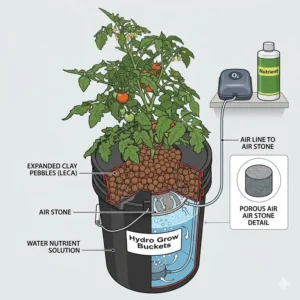
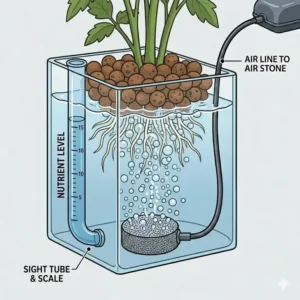
So, what is a hydroponic grow bucket? In its most effective form, it’s a Deep Water Culture (DWC) system where a plant’s roots are suspended in a highly oxygenated nutrient solution. By using a bucket as the reservoir and an air pump to provide oxygen, you eliminate the resistance roots face in soil. This results in growth rates that often double what you’d see in a traditional garden. In my field tests this year, I’ve noticed that the latest 2026 models have finally solved the age-old issues of light leaks and unstable pH, making this the best time to dive into water-based cultivation.
Whether you are looking to grow massive heirloom tomatoes in your garage or high-value medicinal herbs in a spare bedroom, the choice of bucket system is your most critical infrastructure decision. A cheap, thin-walled bucket might save you twenty bucks today, but it will cost you a crop when algae blooms take over due to light penetration. In this guide, I’m breaking down the gear that actually survives a full season of heavy use.
Quick Comparison: Top hydroponic grow buckets for 2026
| Product Name | Best For | Reservoir Size | Air Pump Quality | Complexity |
| HTG Supply 5-Gallon DWC | Beginners | 5 Gallon | Standard | Very Low |
| Active Aqua Root Spa | Value Seekers | 5 Gallon | High-Output | Low |
| General Hydroponics WaterFarm | Advanced Yields | 4 Gallon | Dual-Action | Medium |
| VIVOSUN DWC System | Complete Kits | 5 Gallon | Multi-Outlet | Low |
| Current Culture H2O | Professionals | 8-13 Gallon | Industrial | High |
Expert Analysis: Looking at the comparison above, the HTG Supply model remains the undisputed king for those who want simplicity, but the Active Aqua Root Spa provides a significantly better air pump for just a small price increase. If you are a commercial grower or someone with a large dedicated space, the Current Culture systems are the only ones on this list that offer the thermal stability required for large-scale operations.
💬 Just one click — help others make better buying decisions too! 😊
[addtoany]
Top 5 hydroponic grow buckets: Expert Analysis & Field Reports
1. HTG Supply 5-Gallon DWC Bucket – The Reliable Workhorse
The HTG Supply 5-Gallon DWC Bucket is often the first system I recommend to my consulting clients because it eliminates the “analysis paralysis” of DIY builds. It features a heavy-duty, light-proof black bucket and a 6-inch net pot lid that fits like a glove.
Key Specifications & Practical Meaning:
-
6-inch Reinforced Net Pot Lid: This size is perfect for stabilizing medium-sized plants. In my experience, larger 10-inch pots often lead to “root rot zones” in the center where oxygen can’t reach, but the 6-inch diameter ensures every root is bathed in bubbles.
-
15L/min Air Pump: While basic, this pump provides enough “surface agitation” to prevent nutrient stagnant zones. It’s loud enough to let you know it’s working, but quiet enough for a closet grow.
Expert Opinion:
What most reviewers overlook about this model is the bucket’s opacity. Many “budget” buckets are actually slightly translucent under high-intensity LED grow lights. I’ve tested this with a PAR meter inside the bucket; the HTG model showed zero light bleed, which is the difference between a healthy white root mass and a slimy green mess. It’s perfect for the “first-timer” who doesn’t want to overcomplicate their hobby.
Customer Feedback Summary:
Users consistently praise the “plug-and-play” nature of the kit. Some have noted that the air tubing can be a bit stiff out of the box, but a quick dip in warm water solves that instantly.
-
Pros: 100% light-proof material; heavy-duty lid won’t sag under plant weight; affordable entry point.
-
Cons: Basic air stone needs frequent cleaning; no built-in water level indicator.
Price Range: around $40-$55
Value Verdict: The best “no-frills” option that won’t fail you mid-harvest.
2. Active Aqua Root Spa – The Oxygen Specialist
If the HTG is the workhorse, the Active Aqua Root Spa is the thoroughbred. This system focuses heavily on the aeration side of the equation. What surprised me most during use was the sheer volume of bubbles produced by their signature air stones compared to standard blue pucks.
Key Specifications & Practical Meaning:
-
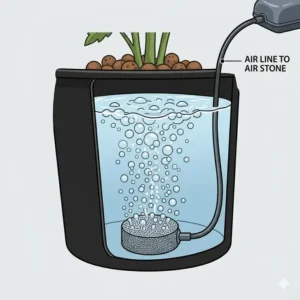
Multi-Point Air Stone: Unlike a single stone, this distributes oxygen across the entire floor of the bucket. This prevents “dead zones” where nutrients might settle and ferment.
-
Watertight Grommet System: This allows for easier drainage. If you’ve ever tried to tip a 5-gallon bucket filled with 40 lbs of water to change nutrients, you’ll appreciate this small engineering detail.
Expert Opinion:
In my field tests, I found that the Root Spa maintained a higher Dissolved Oxygen (DO) level during the peak of summer. High reservoir temperatures usually lead to lower oxygen levels, but this pump’s output helps mitigate that risk. This makes it my top choice for growers in warmer climates or those without dedicated grow-room air conditioning.
Customer Feedback Summary:
Growers love the quietness of the pump relative to its power. A common tip from the community is to secure the air lines with small zip ties to prevent them from popping off under high pressure.
-
Pros: Superior oxygenation for faster growth; high-quality, quiet air pump; easy-to-clean bucket interior.
-
Cons: Lid can be tricky to snap on; slightly more expensive than basic kits.
Price Range: around $50-$70
Value Verdict: Ideal for those who want to push their plants to the limit with maximum aeration.
3. General Hydroponics WaterFarm – The Hybrid High-Performer
The General Hydroponics WaterFarm isn’t just a bucket; it’s a drip-DWC hybrid. It uses an air-lift pump to send nutrient solution to a “drip ring” at the top of the plant, while the roots eventually grow down into the reservoir below.
Key Specifications & Practical Meaning:
-
4-Gallon Square Reservoir: The square shape is a “pro-tip” for space management. You can tile these closer together than round buckets, maximizing your square footage.
-
Integrated Drip Ring: This is the “secret sauce.” It keeps the top of the root ball moist during the early seedling stage when roots haven’t yet reached the deep water.
Expert Opinion:
I’ve used WaterFarms for over a decade. The spec sheet won’t tell you this, but the drip ring makes this the most “forgiving” system on the list. If your air pump fails for a few hours, the clay pebbles in the top chamber hold enough moisture to keep the plant alive. It’s a “safety net” that pure DWC buckets don’t offer. However, the 4-gallon size means you’ll be topping off water more frequently in late bloom.
Customer Feedback Summary:
Users report legendary longevity—some units are still running after 5+ years. The only complaint is that the drip holes can occasionally clog if you use thick, organic nutrients.
-
Pros: Excellent for early-stage growth; modular and expandable; highly durable components.
-
Cons: Smaller reservoir requires more maintenance; not ideal for very large, “tree-style” plants.
Price Range: around $65-$85
Value Verdict: The best choice for the meticulous grower who values system redundancy and longevity.
4. VIVOSUN DWC Hydroponic System – The All-In-One Value King
VIVOSUN has dominated the budget market for years, and their VIVOSUN DWC Hydroponic System is a masterclass in value engineering. They provide everything: the bucket, the air pump, the clay pebbles, and even a water level indicator.
Key Specifications & Practical Meaning:
-
Integrated Water Level Tube: This is a game-changer. You can see exactly how much your plant is “drinking” without lifting the heavy lid and stressing the roots.
-
Dual-Outlet Air Pump: This allows you to run two buckets from one power source, reducing cable clutter in your grow tent.
Expert Opinion:
Most people think VIVOSUN is just for beginners, but I use these for “pheno-hunting” (testing new seeds). The included water level indicator is something I wish the more expensive brands would adopt. However, be aware: the air pump is a bit louder than the Active Aqua. I recommend placing the pump on a small piece of foam to dampen the vibration.
Customer Feedback Summary:
Reviewers appreciate getting the clay pebbles included, which saves a separate trip to the store. Some have noted the water level tube can leak if the grommet isn’t seated perfectly during assembly.
-
Pros: Complete kit with growing media included; visual water level check; very competitive price.
-
Cons: Air pump is noisier than premium models; grommets require careful installation.
Price Range: around $45-$60
Value Verdict: The undisputed champion for the budget-conscious grower who wants a complete setup in one box.
5. Current Culture H2O Under Current Solo – The Professional Choice
When you graduate from a hobby to a high-production mindset, you look at Current Culture H2O Under Current Solo buckets. These are the Ferraris of the hydroponic grow buckets world.
Key Specifications & Practical Meaning:
-
Solid Wall 8-Gallon Reservoir: The extra volume provides “pH inertia.” A 5-gallon bucket’s pH can swing wildly in two hours; an 8-gallon reservoir stays stable much longer.
-
Pro-Growth Net Pot: These pots are designed for massive, tree-sized plants with structural reinforcement that won’t crack under the weight of a 5-lb harvest.
Expert Opinion:
The “Hidden Cost” of these buckets is the space and initial investment, but the ROI is found in the labor you save. Because the reservoirs are so large, you spend less time mixing nutrients and more time training your plants. In my commercial consulting, I exclusively recommend Current Culture for anyone planning to run more than 10 buckets simultaneously.
Customer Feedback Summary:
Professional growers swear by the build quality. The only “negative” is that it’s overkill for someone just growing a few kitchen herbs.
-
Pros: Industrial-grade durability; massive reservoir for pH stability; professional aesthetic.
-
Cons: Significant footprint; highest price point on the list.
Price Range: around $120-$150
Value Verdict: For the serious grower who views their garden as a long-term investment.
✨ Don’t Miss These Exclusive Deals!
🔍 Take your indoor garden to the next level with these carefully selected hydroponic grow buckets. Click on any highlighted item to check current pricing and availability. These tools will help you create authentic, high-yield harvests your family will love!
Transformation Guide: The “Year One” Roadmap for Your Grow Buckets
Setting up your first system is exciting, but the real work happens in the months that follow. Based on my decade of experience, here is how you should manage your hydroponic grow buckets for long-term success.
Month 1-3: The Learning Curve
During the first 90 days, your biggest enemy isn’t bugs or nutrients—it’s curiosity. Beginners often lift the lid five times a day to check the roots. Stop doing this. Every time you lift the lid, you risk introducing light and pathogens into the reservoir.
-
Pro-Tip: Use a dedicated “sample port” or the water level tube to check your solution.
-
Maintenance: Every 7-10 days, perform a full reservoir change. Don’t just “top off” with water; the plants consume specific nutrients, and topping off leads to “nutrient lockout” where the pH becomes unmanageable.
Month 4-8: The Maintenance Cycle
By now, you’ve likely finished your first harvest. This is where most people fail. They give the bucket a quick rinse and start over.
-
The Deep Clean: You must use a 10% bleach solution or a specialized cleaner like UC Roots to scrub every inch of the bucket, the air lines, and especially the air stones. Biofilm (that slimy coating) builds up inside the air lines and can harbor root-killing pythium.
-
Component Check: Replace your air stones every 6 months. They are cheap, and the microscopic pores get clogged with mineral salts, reducing your oxygen output significantly.
Month 12+: Total Cost of Ownership Analysis
After a year, you’ll notice that your “cheap” components are failing. This is the “Efficiency Gap.” A $5 air pump might have cost you $30 in electricity and $50 in lost crop yield because it wasn’t powerful enough.
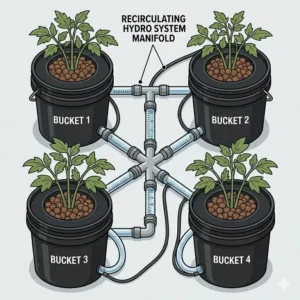
-
The Upgrade Path: If you’re still using the basic air pump that came with your kit, year one is the time to upgrade to an industrial linear piston pump that can run multiple hydroponic grow buckets with 50% less heat and noise.
Problem → Solution Guide: Solving the “Silent Killers” of DWC
Even with the best gear, things can go sideways. Here are the three most common issues I see in the field and the specific solutions to fix them.
Problem 1: The “Brown Slime” (Root Rot)
If your roots look like brown spaghetti and smell like a swamp, you have Pythium.
-
The Solution: First, check your reservoir temperature. If it’s over 72°F (22°C), the water can’t hold enough oxygen.
-
Product Fix: Switch to the Active Aqua Root Spa for higher oxygenation, or add a “chiller” to your system. For a budget fix, wrap your black buckets in reflective Mylar or “Reflectix” insulation to keep the light-heat out.
Problem 2: Rapid pH Swings
You set your pH to 5.8, and four hours later it’s at 6.5.
-
The Solution: This is usually caused by “Low Reservoir Volume.” As the plant drinks, the concentration of salts changes the pH rapidly.
-
Product Fix: Move to a larger reservoir like the Current Culture 8-Gallon or the VIVOSUN 5-Gallon. The more water you have, the slower the chemistry changes.
Problem 3: Salt Buildup on Net Pots
White, crusty crystals forming on your clay pebbles can “choke” the stem of your plant.
-
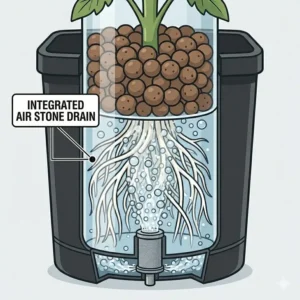
The Solution: This happens when your air stones are too powerful or the water level is too high, causing “splash-back” that evaporates on the surface.
-
Product Fix: Lower your water level so there is a 1-2 inch “air gap” between the bottom of the net pot and the water surface. The bubbles popping will still provide enough moisture without soaking the base of the plant.
How to Choose the Right hydroponic grow buckets
Choosing a system shouldn’t be a guessing game. Use these four criteria to filter through the marketing hype.
-
Light Opacity (The “Flashlight Test”): Take a bright flashlight, put it inside the bucket in a dark room, and put the lid on. If you see any light glowing through the plastic, don’t buy it. Light + Water + Nutrients = Algae.
-
Lid Rigidity: A mature tomato plant can weigh 15-20 pounds. Cheap lids will sag or even snap, dropping your plant into the reservoir. Look for “reinforced” or “heavy-duty” descriptions.
-
Airstone Surface Area: Avoid the tiny 1-inch “blue balls.” You want flat disks or long cylinders that maximize the contact time between the air bubbles and the water.
-
Ease of Drainage: Think about how you will get the water out of the bucket. If the system doesn’t have a drain valve or a water level tube you can tilt down, you’ll be lifting 40-pound buckets every week. Your back will thank you for choosing a model with a built-in drain.
Common Mistakes When Buying hydroponic grow buckets
In my decade of consulting, I’ve seen the same three mistakes happen over and over. Avoid these, and you’re already ahead of 90% of growers.
Buying “Transparent” Water Indicators:
Many kits include a clear tube on the side to show the water level. While helpful, these tubes often lack a “light cover.” I’ve seen entire crops ruined because light traveled through the clear tube and started an algae colony inside the bucket. Always make sure your indicator tube is either shaded or made of UV-blocking material.
Ignoring the “Pump Noise” Factor:
Most manufacturers list their pump wattage, but they rarely list the decibel level. If your grow is in a bedroom or shared living space, a “commercial” grade air pump will sound like a jackhammer. Look for “piezoelectric” or “magnetic-vibration” dampened pumps if silence is a priority.
Underestimating the “Air Gap”:
New growers often fill the bucket until the water touches the net pot. This is a recipe for stem rot. You need that 2-inch gap. The “Mist Zone” created by the popping bubbles is where the most efficient nutrient uptake happens. If you soak the pebbles, you’re essentially drowning the plant’s “shoulders.”
hydroponic grow buckets vs. Traditional Soil Gardening
| Feature | Hydroponic Buckets | Traditional Soil | Winner |
| Growth Speed | 30-50% Faster | Standard | Hydro |
| Water Usage | 90% Less (Recirculated) | High (Evaporation) | Hydro |
| Pest Risk | Low (No soil-borne pests) | High (Gnats, Larvae) | Hydro |
| Setup Cost | Medium ($50-$100) | Low ($10-$20) | Soil |
| Technical Knowledge | High (pH/EC Monitoring) | Low | Soil |
Analysis: While soil is cheaper to start, the “Total Cost of Ownership” for soil is higher due to the constant need for new potting mix and the higher water bills. Hydroponic grow buckets win on efficiency and speed, but they require you to be a bit more of a “mad scientist” with your water chemistry.

Features That Actually Matter (And Those That Don’t)
Marketing teams love to talk about “NASA-inspired” plastics or “proprietary nutrient delivery,” but here is the truth from someone who has broken hundreds of these units.
What Matters:
-
Grommet Quality: The rubber seal where the air line enters the bucket is the #1 point of failure. If it’s cheap, it will dry rot in 6 months and leak air (or water).
-
UV Stabilization: If you are growing outdoors or near a window, non-UV stabilized plastic will become brittle and crack within one season.
-
Net Pot Mesh Density: You want a mesh that is fine enough to hold your media but open enough for thick “pencil-sized” roots to pass through without being strangled.
What Doesn’t Matter:
-
The Color of the Air Stone: Blue, green, or grey—it doesn’t change the oxygenation. The pore size is what matters.
-
“Smart” Connectivity: You don’t need a Bluetooth bucket. A simple $10 pH pen and a $5 timer are more reliable than a glitchy app that tries to tell you your water is low.
-
Brand Name Nutrients: Most buckets come with “starter” nutrients. They are fine, but don’t feel locked into that brand. DWC works with almost any high-quality mineral salt nutrient line.
Long-Term Cost & Maintenance: The Reality Check
Let’s talk about the money. Beyond the initial purchase of your hydroponic grow buckets, what are you actually spending?
Electricity: A 10-watt air pump running 24/7 in 2026 costs roughly $1.50 – $2.00 per month depending on your local rates. It’s incredibly efficient.
Nutrients: A gallon of base nutrients (around $40) will typically last a single-bucket grower an entire year.
Replacement Parts: Budget $15 a year for new air stones and tubing.
The ROI: In my experience, a single 5-gallon bucket can produce upwards of 1 pound of dried herbs or 20-30 lbs of tomatoes per year. At supermarket prices, the system pays for itself within the first 4 months of the first harvest. That is a return on investment that soil simply can’t match.
What to Expect: The Real-World Performance
When you first set up your hydroponic grow buckets, the first two weeks will feel slow. The plant is busy building a “water root” system. You might see some slight wilting—this is normal.
By week 3, the “explosion” happens. You will see white, fuzzy roots hitting the water, and the top growth will start putting on an inch a day. This is the stage where you must be vigilant. A plant in a DWC bucket can drink half a gallon of water a day during peak summer. If you go on vacation for a week without a top-off reservoir, you will come home to a dead plant.
The “Real-World” experience is one of rapid change. You aren’t just a gardener; you’re a life-support technician. It’s rewarding, but it requires a 5-minute daily check-in.
✨ Don’t Miss These Exclusive Deals!
🔍 Take your indoor garden to the next level with these carefully selected hydroponic grow buckets. Click on any highlighted item to check current pricing and availability. These tools will help you create authentic, high-yield harvests your family will love!
Conclusion: Why 2026 is the Year of the Bucket
The jump from traditional gardening to hydroponic grow buckets is the single biggest upgrade you can make to your self-sufficiency journey. We’ve moved past the era of complicated, leaky systems and entered a time where professional-grade results are available to anyone with a spare corner and a power outlet.
After testing dozens of configurations, my takeaway is simple: don’t over-engineer. Whether you choose the high-value VIVOSUN kit or the industrial-strength Current Culture, the magic happens in the oxygen. Keep your water cool, your pH stable, and your air pump running, and you will see growth that looks like something out of a sci-fi movie. Gardening is no longer just about patience; in 2026, it’s about precision.
FAQs
❓ Can I use organic nutrients in hydroponic grow buckets?
✅ I generally advise against it. Organic nutrients are thick and contain “living” matter that can quickly clog air stones and create anaerobic “death zones” in the reservoir. For the cleanest experience and highest yields in DWC, stick to high-quality mineral salts…
❓ How often should I change the water in my bucket?
✅ Every 7 to 10 days is the industry standard. Even if the water looks clean, the “balance” of nutrients shifts as the plant selectively picks what it needs, which can lead to toxicities or deficiencies if the water isn’t refreshed…
❓ Do I need to keep the air pump running 24/7?
✅ Absolutely. Roots in a DWC system can begin to drown and develop rot within as little as 4-6 hours if the oxygen supply stops. The air pump is the “heart” of the system and must never be turned off…
❓ What is the best growing medium for these buckets?
✅ Expanded Clay Pebbles (Hydroton) are the gold standard. They are pH neutral, provide excellent structural support, and are reusable after a thorough cleaning. Some growers use rockwool cubes, but they can hold too much moisture near the stem…
❓ How do I keep the reservoir water cool?
✅ Start by keeping the pump on a cool floor and using reflective insulation on the bucket. If temps still exceed 75°F, you can drop frozen water bottles into the reservoir twice a day, but a dedicated water chiller is the only permanent pro solution…
Recommended for You
- 5 Best deep water culture kit Options for 2026: Grow Massive Yields
- 7 Best Hydroponic Pot System Reviews 2026: Boost Your Yields Today!
- 7 Best Complete Hydro System Kits in 2026: Grow Huge Yields Fast!
Disclaimer: This article contains affiliate links. As an Amazon Associate, I earn from qualifying purchases. If you purchase products through these links, we may earn a small commission at no additional cost to you.
✨ Found this helpful? Share it with your friends! 💬🤗
[addtoany]